Chalk Line
– 2016 –
Industrial Design & Mechanical Engineering
This project explores the design of a multi-spool chalk line tool for contractors.
– 2016 –
This project explores the design of a multi-spool chalk line tool for contractors.
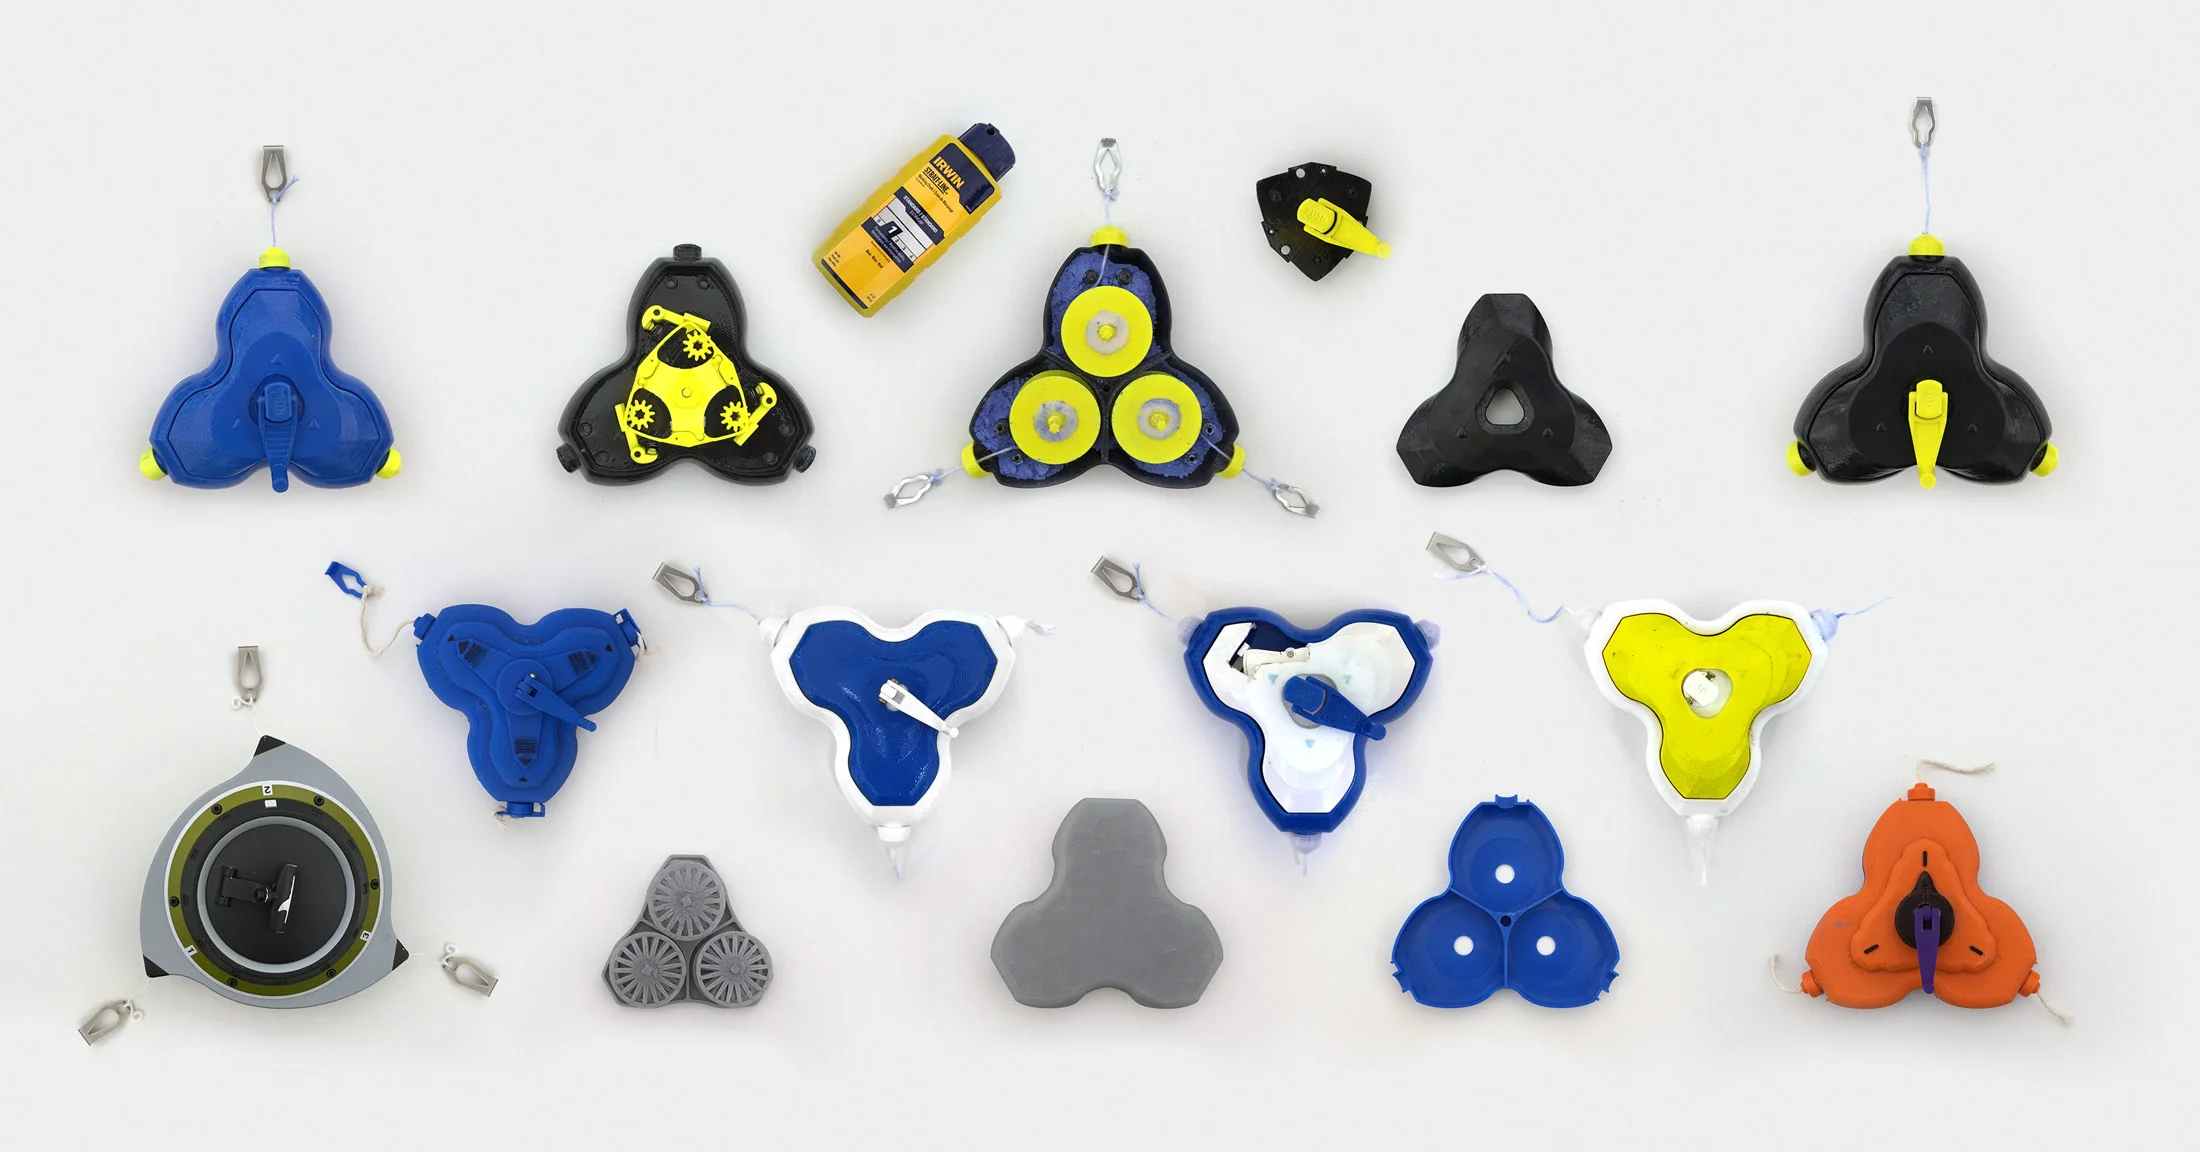
Chalk lines are an important tool in construction and carpentry. They've been around since ancient Egypt and allow a user to mark long, straight lines across many different surfaces. In 2008 D2M reimagined this tool, created a functional prototype, and filed a patent for the new product. What set it apart in the market was the ability to use three chalk colors with a single device. Carpenters routinely carry multiple chalk lines in different colors so this product had the ability to free up space in their toolboxes. Though it was a novel concept, company focuses changed and the idea was shelved for eight years.
In 2016 I was tasked with revisiting the idea and redesigning the old prototype. This was an internal project that focused on improving the user experience, refining the industrial design, and streamlining the manufacturability. It was the first project where I was given full control over the product's vision and where I was responsible for every aspect of the device's design. However, I did frequently collaborate with a senior mechanical engineer to brainstorm user experience and mechanism designs throughout the prototyping process. His insight and critiques really helped me push the design further than either of us thought was possible.
The first thing I noticed about the old prototype was how clunky it felt. It looked bulky, had awful ergonomics, and wasn't intuitive to use. My vision moving forward with the product was to design something rugged yet streamlined. Something that would last but didn’t look chunky. It not only had to survive being thrown into a toolbox, but it had to look like it belonged in a toolbox too. Taking design cues from existing construction tools, I wanted to convey a sense of durability and efficiency.


Before doing any design work, I led a group brainstorm to help guide the new prototype. Instead of asking “how do we make the old prototype better?” I stepped back and questioned the whole premise of the product. The topic of the brainstorms was “how might we apply different colored chalk lines?”. Our group of 4-5 designers and engineers explored possible product paradigms, user experiences, and mechanisms that answered this questions. There was no filter on ideas—realistic, technical, or ambiguous, we wanted to consider a range of design solutions. I then selected the ideas that I thought were most promising and started fleshing them out in SolidWorks.

This project required a lot of prototyping to hone in on a design with an intuitive user experience. I began by taking apart the old prototype and examining it's internal design. This allowed me to better understand the engineering constraints that drove the old design. With this information, and the list of brainstorm ideas, I moved to SolidWorks to model an initial internal mechanism and a rough form study. The goal was to create something quick that could be 3D printed for user experience testing. The testing revealed pain-points in the design and informed the direction for the next prototype. This prototyping phase went on for many iterations until I arrived at the final framework. In addition to the mechanism design, I experimented with different spool sizes, crankshaft designs, and body proportions. 3D printing each prototype allowed me to get a better feel for how the device looked and felt, which heavily informed the refinement of the industrial design. Through iterative prototyping I was able to optimize both the internal mechanism design and outer body design concurrently. The final result was a design that was intuitive, robust, compact, and held a large spool capacity.
I had to explore a lot of engineering solutions in order to achieve the user experience I was after. Figuring out a compact and robust internal mechanism, and designing with DFM and DFA practices in mind, required many iterations to get right. 3D printed prototypes helped give me immediate feedback for the mechanisms and allowed me to hone in on an internal design that was both robust and gave a pleasant user experience. The final mechanical design uses an elegant series of gears, springs, and ratchets to allow the user to effortlessly switch between spools. And each part has been optimized for injection molding and efficient production-line assembly.
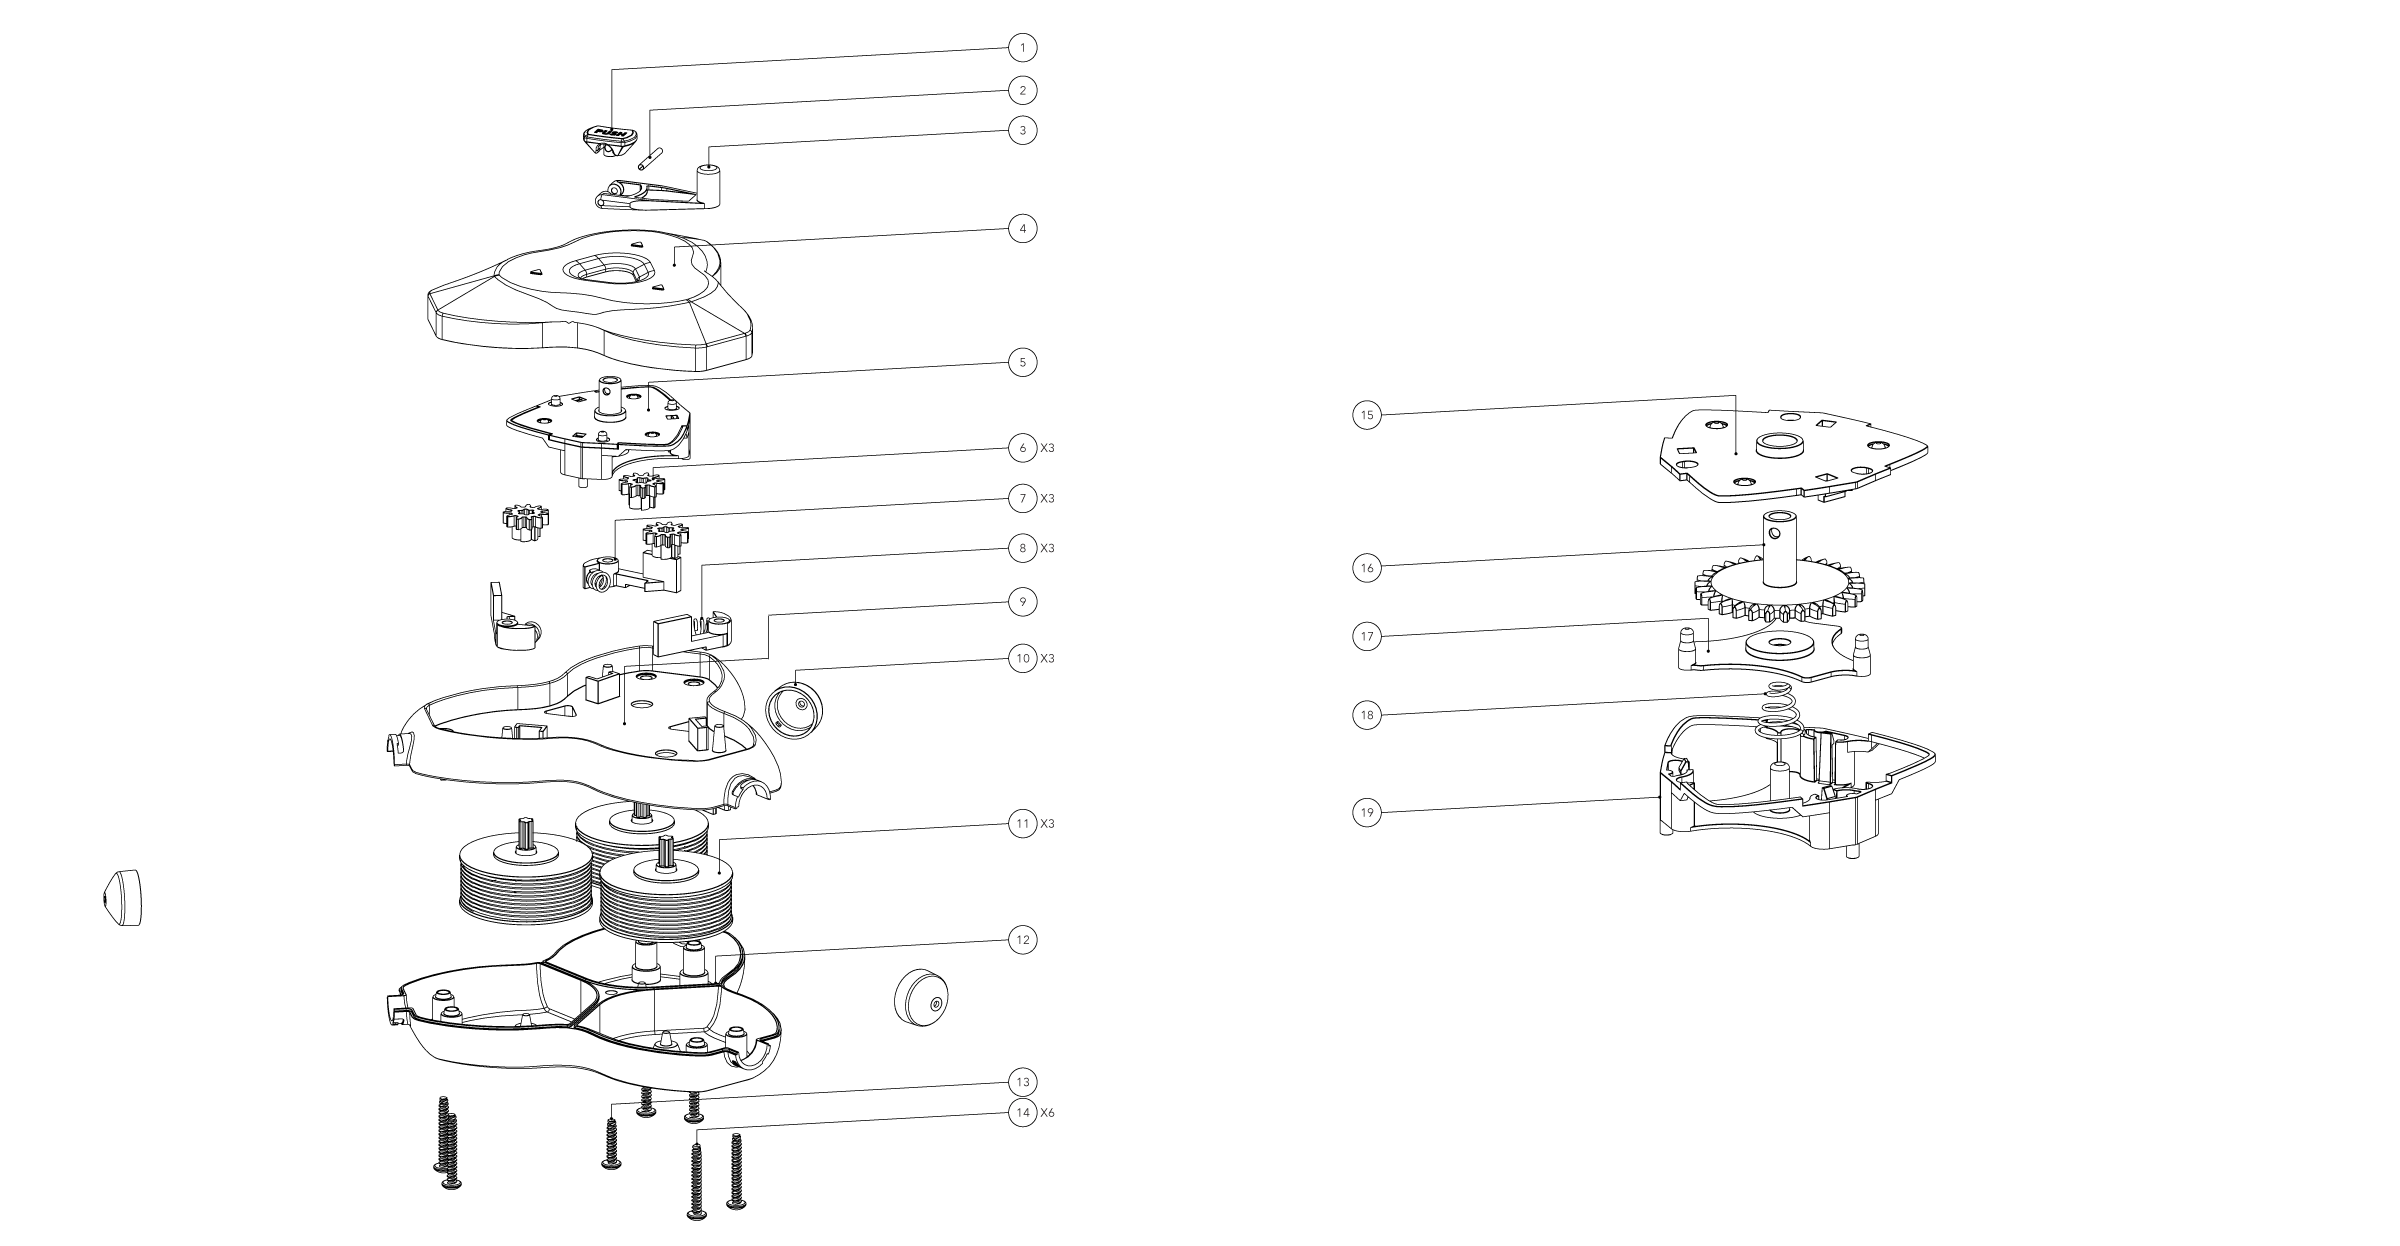
The final product is designed for efficient mass-production. Part count, injection molding tool complexity, and assembly labor are all minimized.
The key components of the internal mechanism are a series of gears, ratchets, and springs. Each spool is attached to a small gear and, by meshing with the main crankshaft gear, can quickly be reeled in. Three spring-loaded ratchets are used to lock the unselected spool gears which prevents them from accidentally unwinding. This whole mechanism is compact, efficient, and highly robust.
The final design was comprised of two compartments: one for the chalk and one for the mechanism. The top compartment held the internal mechanism while the bottom compartment held the three spools and their separate colored chalks.
Switching between the three spools is an incredibly intuitive process. You simply press the middle button, slide the crankshaft towards your spool of choice, and release the button to lock your selection into place. Not only is this simple, but it only requires one hand to operate. Careful consideration went into the design of the body and button to ensure that the product was ergonomic enough to operate with one hand.
As for materials and finish, the body is made from matte black ABS plastic while the glossy yellow accents are made from Delrin. The ABS is structurally strong and, with the dark matte finish, conveys a sense of durability. Meanwhile the UX touchpoints are all a glossy yellow to draw the eye to them and help make using the device more intuitive.


The final design involved a lot of optimization of the internal engineering and external design. Through this optimization I was able to create a product that looked smaller than the old prototype while having a larger spool capacity too. Though the new design does not have quite as large a capacity as a conventional single-spool product, it should be more than enough for most construction applications. And, given the compact size of the device, this was a worthwhile tradeoff.

The final product exemplifies how form and function can elegantly come together. The internal components drove the external form while, at the same time, the user experience drove the internal components. Such an efficient design was possible because the industrial design, user experience, and mechanical engineering were all done concurrently instead of one-after-the-other.